It's happened to the best of us: your Chromecast is acting up, refusing to connect, or just generally lagging. You've tried everything, and now you're staring down the barrel of a factory reset. But what really happens after a Chromecast reset, and how do you navigate the re-setup process to get back to your streaming bliss? This comprehensive guide will walk you through every step, ensuring you understand the implications and can confidently bring your device back to life, better than ever.
At a Glance: What You Need to Know
- A Reset is a Full Wipe: It erases everything—Wi-Fi, accounts, personalized settings—restoring your Chromecast to its out-of-the-box state.
- Why Do It? To fix persistent connectivity, performance issues, software glitches, or to prepare the device for a new owner.
- You'll Need: Your Wi-Fi network name and password, and the Google Home app on your phone or tablet.
- Methods Vary by Model: You can reset using a physical button, the Google Home app, or the Google TV remote (for newer models).
- Re-setup is Essential: After a reset, your Chromecast will appear as a brand-new device, requiring you to go through the initial setup process again.
Why Reset Your Chromecast? The Benefits of a Fresh Start
Think of a Chromecast factory reset as hitting the "Ctrl+Alt+Del" for your smart streaming device, but far more profound. Instead of just restarting, it wipes the slate clean, eradicating all stored data and settings. This powerful action isn't usually your first troubleshooting step, but it becomes indispensable when other solutions fall short.
So, when should you reach for that reset button?
- Persistent Connectivity Woes: If your Chromecast constantly drops Wi-Fi, refuses to connect, or shows "not found" in the Google Home app, a reset often resolves underlying network configuration conflicts.
- Performance Paralysis: Is your stream buffering endlessly? Is the interface sluggish or freezing? A factory reset can clear out accumulated software glitches and improve responsiveness, much like defragmenting an old computer.
- Stubborn Software Glitches: Sometimes, a firmware update can go awry, or an unknown bug might plague your device. A reset reinstalls the core software components, often resolving these deep-seated issues.
- Changing Ownership or Selling: Planning to give your Chromecast to a friend or list it online? A factory reset is crucial to protect your personal data, Google account links, and Wi-Fi credentials. You wouldn't hand over a phone without wiping it, right?
- Forgotten Credentials: If you've lost access to the Google account linked to your Chromecast or simply can't remember the setup details, a reset provides a fresh start.
- Major Network Changes: Switched internet providers? Got a new router with a different password? While you can update Wi-Fi settings, a clean reset ensures your Chromecast perfectly integrates with your new network environment.
- When All Else Fails: You've tried rebooting, updating, and every other trick in the book. If your Chromecast is still unresponsive or misbehaving, a factory reset is often the last, best resort.
By restoring your device to its original factory settings, you're giving it a clean bill of health, often leading to improved stability and performance.
Crucial Considerations Before You Reset
Before you commit to the digital purge, pause for a moment. A factory reset is a significant step, and knowing what to expect can save you frustration later.
What You'll Lose (and What You Won't)
The most important thing to understand is data loss. A factory reset will erase all personal settings, Wi-Fi network configurations, linked accounts, and preferences from the Chromecast itself. This means your custom device name, parental controls (if set up on the device), and any specific app integrations stored on the Chromecast will vanish.
What won't you lose? Your streaming service subscriptions (Netflix, Hulu, etc.) are tied to your accounts, not the Chromecast. Your Google account itself remains intact. Essentially, you're not deleting your digital life, just the digital footprint your Chromecast had.
The Re-Setup Requirement
This is non-negotiable. After a factory reset, your Chromecast reverts to being a brand-new device, just like when you first unboxed it. It will require a complete re-setup, including connecting to Wi-Fi, linking to your Google account, and configuring any desired settings. This isn't a quick fix; it's a full overhaul.
Essential Tools for Re-connection
To successfully re-setup your Chromecast, you'll absolutely need:
- Your Wi-Fi Network Name (SSID): Often found on a sticker on your router, or in your network settings.
- Your Wi-Fi Password: This is critical. Without it, you cannot reconnect your Chromecast to the internet. If you've forgotten it, you'll need to retrieve it from your router settings or call your internet service provider.
- A Smartphone or Tablet: With the Google Home app installed and updated. This app is the primary interface for setting up and managing your Chromecast.
- Your Google Account Credentials: The email address and password for the Google account you wish to link to your Chromecast.
While a factory reset might seem intimidating, preparing yourself with these considerations makes the process much smoother.
How to Reset Your Chromecast: A Step-by-Step Guide
There isn't a single "reset button" that works for every Chromecast model. Depending on your device, you'll use a specific method. Here, we break down the most common and effective approaches.
Method 1: The Physical Reset Button (All Models)
This is the most universal and often recommended method, especially if your Chromecast is unresponsive or won't connect to Wi-Fi. It's akin to a hard reboot for a computer.
For Chromecast (1st, 2nd, 3rd Gen, and Ultra):
- Locate the Button: This is usually a small, recessed button.
- Chromecast (1st gen): On the side, near the HDMI port.
- Chromecast Ultra, 3rd gen & newer: Typically on the back or side, often near the micro-USB power port.
- Power On: Ensure your Chromecast is plugged into both your TV's HDMI port and a power source using its USB cable and adapter. Wait for it to boot up and display something on your TV screen, even if it's an error message.
- Press and Hold: Using your finger (or a paperclip if it's a pinhole), press and hold the reset button firmly. Do not release it.
- Watch the LED: Keep holding the button. The LED indicator light on your Chromecast will start to blink. Continue holding until the LED begins to flash rapidly (usually after about 25 seconds).
- Release: Once the rapid flashing begins, release the button. Your TV screen may briefly show a "Resetting to factory defaults" message.
- Reboot: The device will automatically reboot, signifying that the reset is complete.
Your Chromecast is now back to factory settings and ready for re-setup.
Method 2: Via the Google Home App (1st, 2nd, 3rd Gen, Ultra)
This method is convenient if your Chromecast is still connected to Wi-Fi and responsive, allowing you to manage it through the app.
- Open Google Home: Launch the Google Home app on your smartphone or tablet. Make sure you're signed in with the Google account linked to your Chromecast.
- Find Your Device: On the app's home screen, locate and tap on the tile for the Chromecast you wish to reset.
- Access Settings: Tap the gear icon (Settings) in the top right corner of the device's screen.
- Factory Reset: Scroll down. You might see a "More" or "Settings" option first, tap that if present. Then, look for and tap "Factory reset" (or sometimes "Remove device" which can initiate a reset).
- Confirm: The app will prompt you to confirm your decision. Tap "Reset" or "Erase Device."
- Wait for Reboot: Your Chromecast will begin the reset process and automatically reboot once finished.
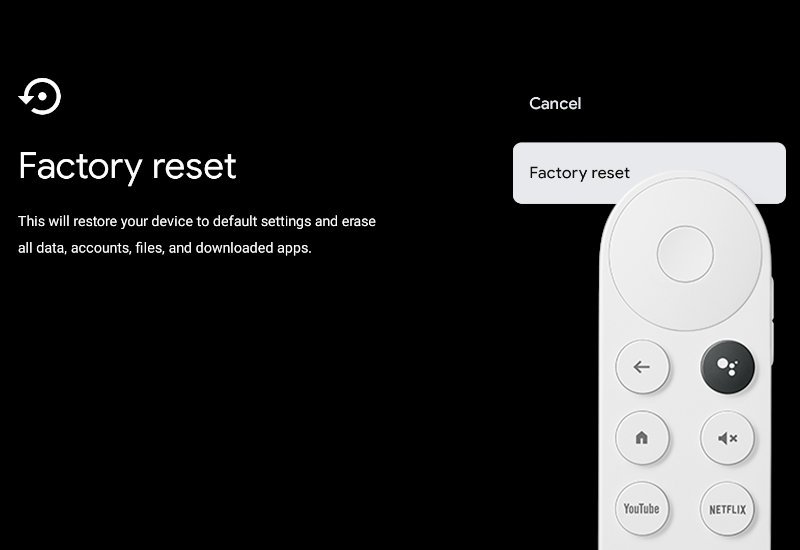
Method 3: Resetting a Chromecast with Google TV (Newer Models) Using the Remote
Chromecast with Google TV models have their own operating system and remote control, making the reset process slightly different.
- Turn On & Navigate: Power on your TV and Chromecast with Google TV. Using your Voice Remote, navigate to your profile icon in the top right corner of the home screen.
- Open Settings: Select the gear-shaped "Settings" icon from the profile menu.
- System Settings: Scroll down and select "System."
- About Device: Within the System menu, choose "About" (often indicated by a circled "i" icon).
- Factory Reset Option: Select "Factory reset."
- Confirm Erase: You'll be presented with a confirmation screen. Select "Erase everything" to proceed with the permanent reset.
- Remote Resync (If Prompted): After the reset, your device may prompt you to resync your remote. Hold down the "Back" and "Home" buttons on your remote simultaneously until it connects.
Method 4: Using a Computer and Chrome Browser (Advanced Users Only)
While technically possible, this method is generally more complex and less reliable for troubleshooting a completely unresponsive device. It involves typing chrome://cast or chrome://devices into your Chrome browser, which can sometimes provide management options if your device is still partially discoverable on the network. For a full factory reset, the physical button or Google Home app methods are almost always preferred and more effective. We advise sticking to the simpler methods outlined above unless you have specific advanced troubleshooting needs.
Soft Reboot vs. Hard Reset: What's the Difference?
Before you resort to a factory reset, it's worth understanding the difference between a "soft reboot" (or restart) and a "hard reset" (or factory reset). Many minor issues can be solved with a simple restart, which keeps all your settings intact.
- Soft Reboot: This is like turning your computer off and on again. It clears temporary memory, refreshes connections, and can fix minor glitches without erasing any data. It's the first thing you should always try.
- Hard Reset (Factory Reset): This is a complete wipe, returning the device to its default, out-of-the-box state, as discussed throughout this guide.
How to Perform a Soft Reboot:
- Using the Google Home App:
- Open the Google Home app on your device.
- Find and tap your Chromecast's tile.
- Tap the gear icon (Settings) in the top right.
- Scroll down and tap "More settings" or the three dots menu.
- Select "Reboot."
- Unplug and Plug Back In: This is the simplest and often most effective method for a soft reboot.
- Simply unplug the USB power cable from your Chromecast (or from the wall adapter).
- Wait about 10 seconds to allow any residual power to drain.
- Plug the power cable back in. Your Chromecast will restart. (Note: Unplugging the HDMI cable only does not reboot the Chromecast as it still has power.)
If a soft reboot doesn't resolve your issue, then a factory reset is the logical next step.
Navigating Common Post-Reset Hurdles
Even after a successful reset, you might encounter a few snags during the re-setup process. Don't worry; most are easily overcome.
- Chromecast Doesn't Appear in Google Home App:
- Check Power: Ensure your Chromecast is correctly plugged into both power and TV, and its LED light is on.
- Wi-Fi Proximity: Make sure your phone/tablet is connected to the same Wi-Fi network you want to connect the Chromecast to, and that both devices are reasonably close to your router.
- App Refresh: Try closing and reopening the Google Home app. Sometimes a quick refresh is all it needs.
- Bluetooth/Location: Ensure Bluetooth and Location Services are enabled on your phone/tablet, as these are often required for initial device discovery.
- Network Band: If your router offers both 2.4GHz and 5GHz Wi-Fi bands, try connecting your phone to the 2.4GHz band during setup. Some older Chromecast models only support 2.4GHz, and even newer ones can have smoother initial setup on that band.
- "Could Not Connect to Wi-Fi" during Setup:
- Password Accuracy: Double-check your Wi-Fi password. It's the most common culprit. Remember it's case-sensitive!
- Router Reboot: Power cycle your Wi-Fi router and modem (unplug them for 30 seconds, then plug back in). This often resolves temporary network glitches.
- Network Congestion: If you have many devices on your network, try to reduce traffic during setup.
- Signal Strength: Ensure your Chromecast isn't too far from your Wi-Fi router.
- Chromecast Still Performing Poorly After Reset and Re-setup:
- Firmware Updates: Immediately after setup, your Chromecast will often download and install the latest firmware updates. Ensure this process completes without interruption. Sometimes issues are fixed in the newest software.
- Power Source: Are you using the original power adapter and cable that came with your Chromecast? Using a different, underpowered adapter can lead to instability.
- Network Interference: Other electronics or physical obstructions can interfere with your Wi-Fi signal. Try moving your Chromecast or router slightly.
- HDMI Port: Try a different HDMI port on your TV, or connect the Chromecast directly to power instead of a TV's USB port (which might not provide enough power).
If you’re still scratching your head after these steps, it might be time to consult Google’s official support page for more specific troubleshooting or consider that your device might have a hardware fault.
The Post-Reset Journey: Re-setting Up Your Chromecast
Once your Chromecast has successfully undergone its factory reset, it’s like a newborn baby – full of potential, but needing everything configured from scratch. The process is straightforward, mirroring the initial setup you did when you first got the device.
Here’s your step-by-step guide to bringing your Chromecast back online:
Step 1: Power Up and Connect
- Plug In: Connect your Chromecast to an available HDMI port on your television.
- Power On: Plug the USB power cable into your Chromecast and then into the provided power adapter. Plug the adapter into a wall outlet. (Avoid using your TV's USB port for power, as it might not supply enough juice).
- Switch Input: Turn on your TV and switch to the correct HDMI input where your Chromecast is connected. You should see a "Set me up" screen, prompting you to download the Google Home app.
Step 2: Prepare Your Smartphone/Tablet
- Download Google Home: If you don't already have it, download the Google Home app from the Apple App Store or Google Play Store.
- Open & Sign In: Launch the app and sign in with the Google account you wish to link to your Chromecast. This is the account you'll use to manage the device.
- Enable Essentials: Ensure your phone or tablet has Wi-Fi, Bluetooth, and Location Services turned on. These are crucial for the app to discover and communicate with your Chromecast.
Step 3: Begin the Setup Process
- Discover Device: In the Google Home app, you should see a prompt like "Set up 1 device" or a banner indicating a new device is found. If not, tap the "+" icon in the top left corner, then select "Set up device" > "New device."
- Select Your Home: The app will ask you to select a "Home" to add the device to. Choose an existing one or create a new one.
- Find Your Chromecast: The app will search for nearby devices. Once your Chromecast is discovered, tap on it.
- Confirm Code: Your TV will display a code (e.g., "ABCD"). The Google Home app will show the same code. Confirm they match to ensure you're connecting to the correct device.
- Location Permission (Optional): You might be asked to allow location access for your device to work best. Grant it if you wish.
Step 4: Connect to Wi-Fi
- Choose Network: The Google Home app will display a list of available Wi-Fi networks. Select your home's Wi-Fi network.
- Enter Password: Carefully enter your Wi-Fi network's password. Remember, it's case-sensitive.
- Connect: Tap "Connect" or "Next." Your Chromecast will attempt to join the network.
Step 5: Link Your Google Account and Personalize
- Link Account: After connecting to Wi-Fi, the app will ask you to link your Google Account to the Chromecast. This is the account you signed into the Google Home app with. Confirm your choice.
- Voice Match (Optional): If you have a Chromecast with Google TV, you might be prompted to set up Voice Match for personalized results from Google Assistant.
- Personalize Settings:
- Device Name: You can keep the default name (e.g., "Living Room TV") or choose a custom name.
- Ambient Mode/Screensaver: For Chromecast with Google TV, you'll configure screensaver preferences, including Google Photos or art gallery.
- Notifications: Decide if you want certain notifications from the Chromecast on your phone.
- Install Apps (Chromecast with Google TV): If you have a Chromecast with Google TV, you'll be prompted to choose and install your favorite streaming apps (Netflix, Disney+, YouTube, etc.) from the Google Play Store.
Step 6: Firmware Update (Crucial!)
- Automatic Update: Your Chromecast will almost certainly check for and download the latest firmware updates after connecting to the internet. This is a critical step for performance, security, and access to new features.
- Do Not Interrupt: Allow the update to complete fully. Your device may restart multiple times during this process. Do not unplug your Chromecast until the update is finished and it returns to the home screen or a "ready to cast" display.
Step 7: Test Your Device
- Open a Streaming App: On your phone or computer, open a streaming app like YouTube, Netflix, or Spotify.
- Cast Icon: Look for the "Cast" icon (a rectangle with a Wi-Fi symbol in the corner). Tap it.
- Select Chromecast: Choose your newly re-setup Chromecast from the list of devices.
- Stream Content: Play a video or music. If it appears on your TV, congratulations! Your Chromecast is fully operational.
You've successfully reset and re-setup your Chromecast! It should now be performing optimally, free from previous glitches, and ready to stream your favorite content. If you continue to face issues, it may be time to consult Google's official support channels or consider whether a hardware issue is at play.
Troubleshooting Common Issues After Re-setup
Even with a smooth re-setup, sometimes new problems crop up or old ones linger. Here's how to tackle them:
- Lagging or Buffering During Playback:
- Wi-Fi Signal: Check your Wi-Fi signal strength. If it's weak, try moving your router closer or using a Wi-Fi extender.
- Network Congestion: Too many devices on your network can slow things down. Try pausing downloads or other bandwidth-heavy activities.
- Router Reboot: Give your router and modem another 30-second power cycle.
- App Updates: Ensure the app you're casting from, your Chromecast firmware, and the Google Home app are all up to date.
- Chromecast Not Showing Up as a Cast Target:
- Same Network: Confirm your phone/tablet is connected to the exact same Wi-Fi network as your Chromecast.
- App Refresh: Close and reopen the streaming app, or even the Google Home app.
- Reboot Chromecast: Perform a soft reboot (unplug/plug in) of your Chromecast.
- Router Settings: Check your router's settings. Some routers have "AP Isolation" or "Client Isolation" enabled, which prevents devices on the same network from seeing each other. This needs to be disabled.
- Audio/Video Sync Issues:
- Reboot All: Try rebooting your Chromecast, TV, and any sound systems you're using.
- App Specific: Test with different apps. If it's only one app, the issue might be with that app.
- TV Settings: Check your TV's audio settings for any special processing that might introduce delay.
- Remote Issues (Chromecast with Google TV):
- Batteries: Replace the remote batteries, even if you think they're fine.
- Re-pair: Go to your Chromecast with Google TV's settings (Settings > Remotes & Accessories), select your remote, and try to re-pair it.
- Obstruction: Ensure there are no physical obstructions between the remote and your Chromecast.
Remember, persistence often pays off. Many issues are temporary network glitches that a simple reboot of your entire network (modem, router, Chromecast) can resolve.
Pro Tips for a Smooth Chromecast Experience
Beyond the reset and re-setup, a few best practices can help you maintain optimal performance and avoid future headaches.
- Keep Firmware Updated: Always allow your Chromecast to install firmware updates. These bring new features, security patches, and performance improvements. Don't unplug your device during an update!
- Maintain Wi-Fi Stability: Your Chromecast's performance is only as good as your Wi-Fi. Ensure your router is centrally located, free from obstructions, and consider using a modern, dual-band router.
- Use a Strong Power Source: Always use the original power adapter and cable that came with your Chromecast. TV USB ports or generic phone chargers might not provide sufficient, consistent power, leading to instability or performance issues.
- Secure Your Network: A strong, unique Wi-Fi password is non-negotiable. This protects your network and, by extension, your smart devices.
- Regularly Reboot: A soft reboot (unplugging for 10 seconds) once every few weeks can help clear out temporary data and keep your Chromecast running smoothly, much like restarting your computer.
- Document Credentials: Keep a secure record of your Wi-Fi passwords and Google account details. This makes re-setup or troubleshooting incredibly easy down the line. A password manager is an excellent tool for this.
- Reduce Interference: Keep your Chromecast away from other electronics that might cause wireless interference, such as microwaves, cordless phones, or baby monitors.
- Check HDMI Ports: If you experience video issues, try using a different HDMI port on your TV, or consider an HDMI extender if your Chromecast is crammed against other cables.
- Official Resources: When in doubt, always refer to official Google support pages. They provide the most up-to-date and accurate troubleshooting information for specific models. For a quick refresh on the core process, you can always refer back to our guide on how to reset your Chromecast directly.
By following these tips, you’re not just recovering from a reset; you’re setting up your Chromecast for a long, happy, and glitch-free streaming life. Enjoy your entertainment!